
Views: 0 Author: Site Editor Publish Time: 2026-11-19 Origin: Site


Incoming checks are the batch-level review you do when a delivery of steps arrives. You do this before you accept it into inventory or release it for installation. This gate matters: catching non-conforming steps before the jobsite protects worker safety. It also avoids installation rework and keeps the project compliant with specifications.
A disciplined manhole step quality inspection follows a clear path. Confirm the standard. Review receipt documentation and batch traceability. Run visual, dimensional, and mechanical checks. Apply a sampling plan. Judge results against acceptance criteria. Document everything. Handle non-conformities promptly. Keep every record clear and complete. Do this before you sign off on the delivery.
Check the product standard and approved submittals before the delivery arrives.
Check the batch tracking records and make sure the shipment matches your order.
Do visual, size, and mechanical checks on a random sample from the batch.
Use the written acceptance rules and write down every result with the batch code.
Separate the steps that do not pass inspection and tag them, then notify the supplier in writing.
Begin with the product standard listed in your project specification. That document explains the performance requirements for the steps you ordered. It also sets the test methods your supplier must follow. Read the standard before the truck arrives. You need to know what you are checking against.
Make sure the manufacturer's stated standard matches the one in your specification. A certificate for a different standard does not prove compliance with yours. Ask the supplier to write the standard on the batch paperwork. Then compare it line by line with your project documents. This easy step stops a costly mismatch later.
Get the purchase order and the approved submittals before you open any carton. The purchase order lists the ordered quantity, the model, and the material. The submittals show the approved drawings and the stated load ratings. Together they make up your reference set for the whole inspection.
Check that the delivered product matches the approved submittal, not just the order number. Look at the step profile, the tread pattern, and the fixing details. A supplier may ship a similar model that fits a different frame. That part will not sit correctly in your manhole opening. Treat any difference as a non-conformity and hold the batch.
Keep these documents at the inspection station. Inspectors who work from memory miss details. A printed reference set makes every check fast and repeatable. It also gives you a written basis for accept or reject decisions. When a dispute comes up, the paperwork settles it.
A certificate only helps if it traces to the exact batch you are receiving. A generic certificate shows that some steps met the standard at some point. It does not show that the steps on your loading dock did. Ask the manufacturer for batch traceability records before the shipment leaves the factory. These records link the delivered steps to their production run, their raw materials, and their test results.
Request the incoming inspection records from the manufacturer too. These documents show what the supplier checked and what they found. Look for material certificates with heat numbers when your specification calls for metal components. The heat number ties the steel to a specific mill batch. That link gives you real traceability from mill to manhole. File these papers with the delivery. A missing record is a finding, not a formality.
Check the shipment against the order as soon as the truck arrives. Count the cartons and compare the quantity with the purchase order. Check the model number, the material, and the step profile on each label. Open a few cartons and make sure the contents match the labels. Note any shortage, overage, or wrong model on the delivery receipt before you sign it.
Log the results in your receiving register right away. Record the date, the supplier, the batch number, the quantity received, and the outcome of the count. Add the name of the person who checked the delivery. This log becomes your first inspection record for the batch. Keep it with the traceability file. A clear log settles questions later and supports every decision you make about the delivery.
Start the visual pass in good light. Look at every step in your sample, not just the top one in the carton. Check the surface for smoothness and uniformity. A sound molded step shows a consistent finish with no exposed reinforcement.
Examine the coating across the full step. The coating should cover the tread, the sides, and the fixing points without gaps. Look for runs, sags, or thin spots in the coating. A patchy coating leaves the base material open to moisture and wear. Confirm the coating color matches the approved submittal. Verify that the coating bonds firmly and does not flake at the edges. Note the coating condition on your sheet as good, fair, or poor.
Read the markings next. Each step should carry the model number, the batch code, and the standard reference. Compare these markings with the paperwork you reviewed earlier. Missing or wrong markings break traceability. Record what you find.
Screen each sampled step for workmanship problems. Look for cracks, chips, voids, and sharp edges. Check the tread pattern for incomplete filling. Inspect the fixing holes for burrs or deformation. Any defect that weakens the step or hurts the installer counts as a finding. Run your hand along the edges and confirm the coating there is intact.
Sort findings by severity. A hairline mark on a hidden face may pass. A crack near a fixing point does not. Photograph every defect you flag and note its location on the step. This record supports your accept or reject call and helps the supplier fix the cause. Keep the photos with the batch file so the next inspection has a baseline.
Get the approved submittal drawing and read the target values before you measure anything. The drawing sets the dimensions that control fit and function. Measure the overall step width and the tread depth first. Check the fixing hole spacing and the hole diameter next. These dimensions decide whether the step sits correctly in the manhole wall.
Measure the step height and the profile angle against the drawing. Confirm how deep the fixing legs embed. A short leg will not hold the pull-out load. Write every reading on the inspection sheet next to its target value. You now have a clear picture of the dimensional and technical fit for the batch.
Use a calibrated caliper for hole diameters and small features. Use a steel tape or a laser measure for overall length and width. Check the calibration sticker on each tool before you start. A tool that is not calibrated gives false readings and false confidence.
Take each reading at the same reference point on every sample. Measure the hole diameter at two points across the opening and record the smaller value. Compare each result with the stated tolerances on the drawing. Run a dimensional check on the sample set and log every value. A test-fit of a production-tooled sample against a frame confirms the real fit. Repeat the dimensional checks on each critical dimension every batch review, and keep the sheet with the batch file.
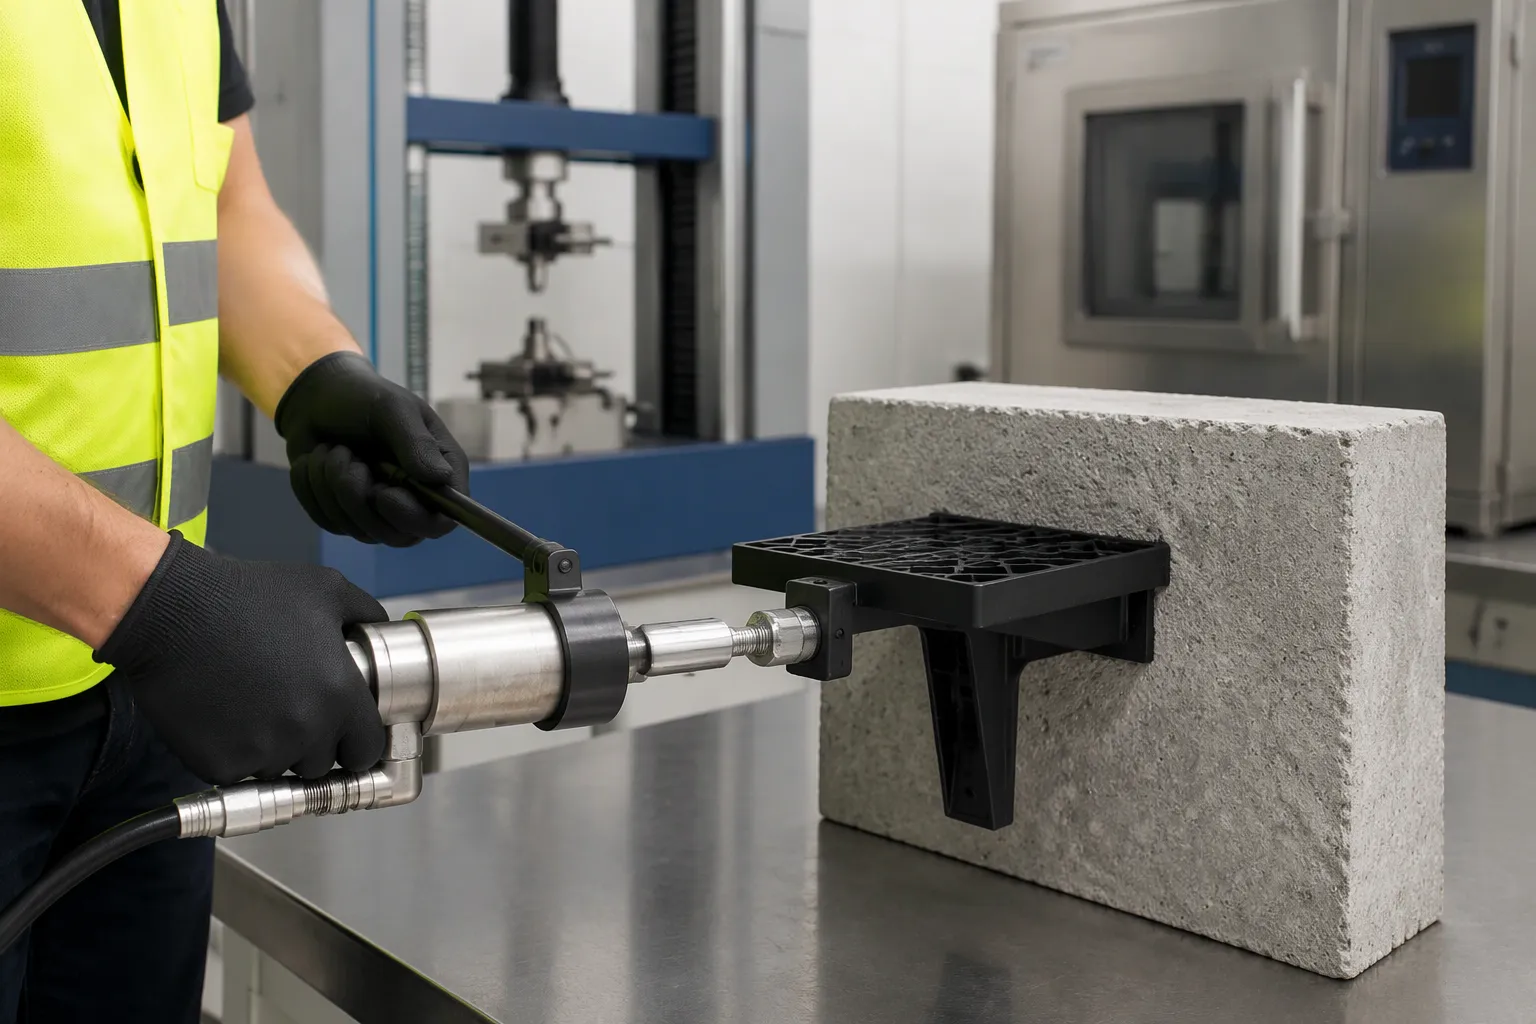
Visual and dimensional checks tell you how a step looks and fits. They do not tell you how it holds under force. Strength and pull-out verification answers that question. This stage of manhole step quality inspection confirms that the step carries its rated load and stays fixed in the wall.
Follow the test method named in your product standard. Apply the load to the tread at the point the standard specifies. Hold the load for the stated duration and watch for deflection. A step that bends beyond the limit or shows cracking fails the check. Record the load value and the result for each sample you test.
Pull-out testing checks the fixing. Apply the pull-out force along the axis of the fixing leg. The step must resist the force without pulling loose or deforming the hole. Test the sample in the same wall material the project uses. A step that holds in a test block may behave differently in a hollow block wall. Match the test setup to the real installation.
Plastic manhole steps should undergo impact testing after conditioning, followed by visual inspection. Conditioning brings the sample to the temperature and moisture state the standard requires. Test the conditioned sample with the specified impact energy. Then inspect the step closely for damage.
Acceptance requires no visual distress. Look for cracks, chips, splits, and loose fixing points. Check the tread and the fixing legs. Any visible damage means the sample fails. Record the conditioning details and the impact result on your sheet. Keep the tested sample with the batch file until you close the delivery.
Run load, pull-out, and impact testing on a sample drawn from the delivered batch, not on a supplier's pre-production piece. The batch sample proves what arrived at your gate. Testing confirms the quality of the delivered steps and gives you hard evidence for the acceptance decision. Plan the testing early so results arrive before the batch moves to the jobsite.
A sample plan turns a full delivery into a check you can handle. The plan sets the sample size and the accept rule. It also names the checks you run on each unit. Base the sample size on the delivery size and the project risk. A recognized scheme such as ISO 2859-1 gives you a structure you can defend. Apply the same sample plan to every delivery so your records stay comparable.
Set the frequency before the first truck arrives. Draw units from every shipment, not from a few chosen shipments. Tighten the sample size when a supplier's history shows problems. Loosen it only after several clean deliveries in a row. After any non-conformity, return to the full sample plan until the supplier proves batch consistency again. Write the sample size and the frequency into your inspection procedure. Every inspector then works from the same rule.
Random selection means every unit has an equal chance of being chosen. Do not pull the first cartons off the truck. Those cartons often sit at the top of the pallet and may hide damage below. A biased pick hides the worst units in the delivery. Instead, number every carton in the delivery and pick your sample from that list.
Use a random number table or draw lots to choose the cartons. Pull units from the top, middle, and bottom of the stack. Record which cartons you opened and which units you kept. Set aside the selected units for dimension checks and testing. Measure the key dimensions on each selected unit and log the readings. Compare those dimensions with the approved drawing before you release the delivery. Keep the opened cartons marked so the rest of the delivery stays traceable. A truly random sample shows the real condition of the delivery, not the condition the supplier wants you to see.
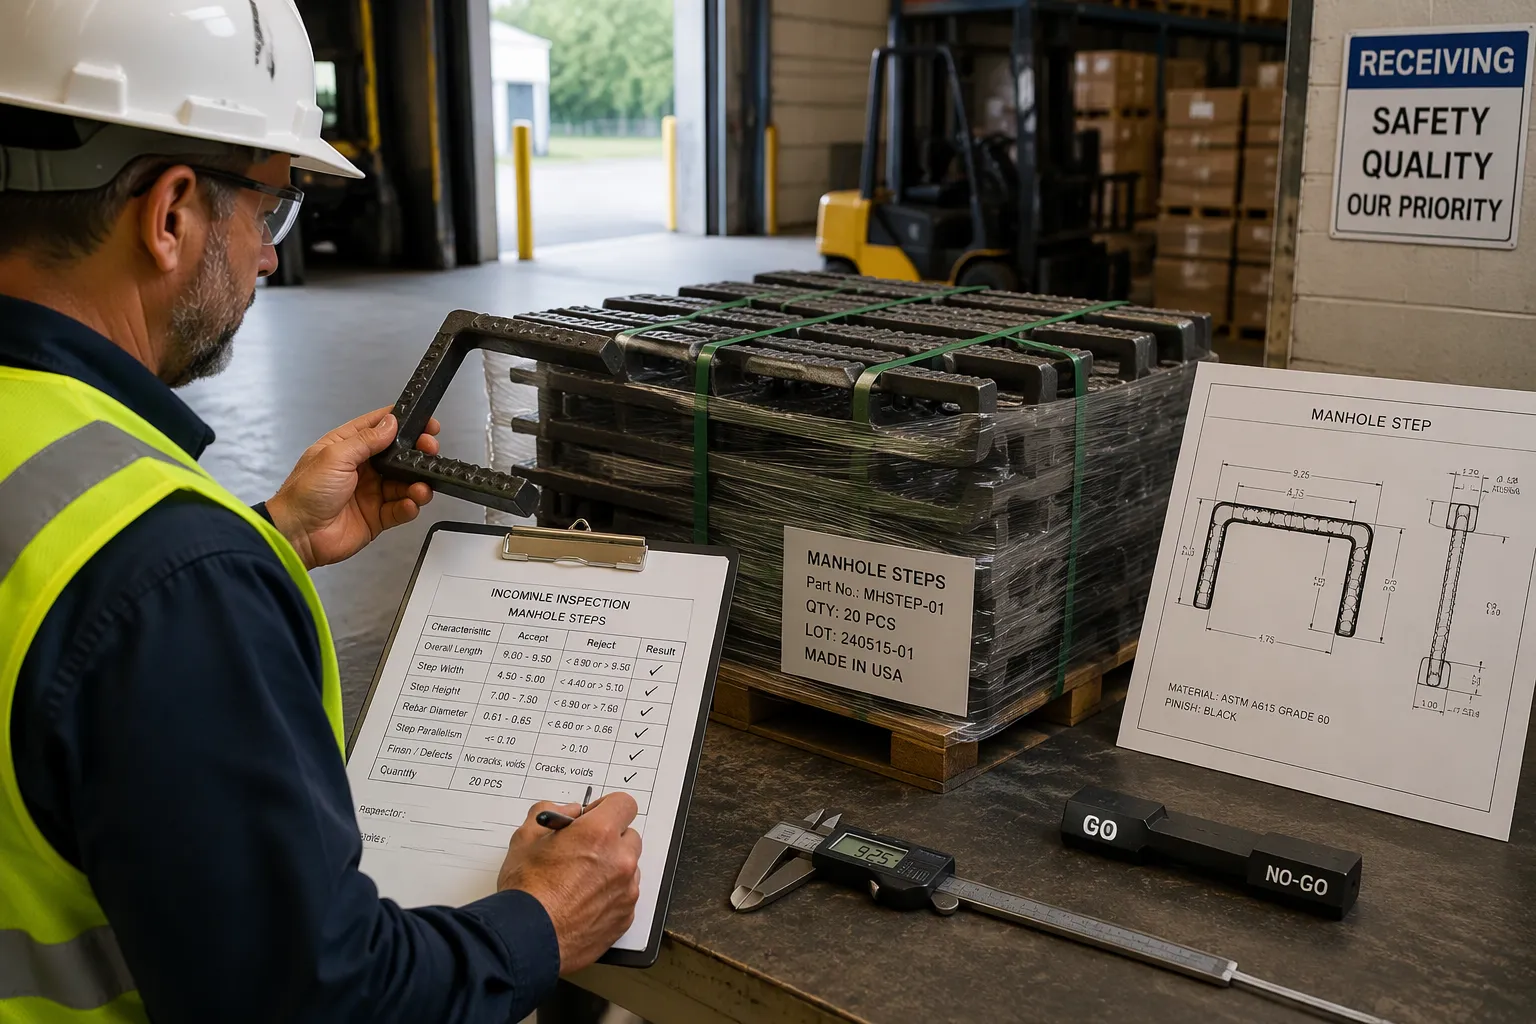
Decide the accept and reject limits before anyone measures the first unit. Your product standard, the approved submittal, and the purchase order all work together to set these limits. Write them on the inspection sheet as clear pass or fail rules. An inspector should never have to guess at the dock.
Take each limit from a named source. The standard gives the mechanical values. The drawing gives the dimensions and their limits. The submittal gives the approved finish and markings. Keep the source document number next to each limit on the sheet. A limit with no source is just an opinion, and opinions do not survive an audit.
A delivery passes when every checked unit clears all the gates. Visual checks show no cracks, voids, or coating gaps. Measured dimensions fall inside the drawing tolerances. Load, pull-out, and impact testing meet the values named in the standard. One failed gate fails the unit. A missing record fails the delivery even when the steps look perfect.
Check | Accept | Reject |
|---|---|---|
Visual | Clean surface, full coating, correct markings | Cracks, voids, exposed reinforcement, wrong markings |
Dimensional | All readings inside drawing limits | Any reading outside the drawing limits |
Mechanical | Meets standard load, pull-out, and impact values | Fails any named value or shows distress |
Documentation | Traceable to the batch, complete | Missing or mismatched records |
Use the accept rule from your sampling plan. Under a scheme such as ISO 2859-1, you compare the number of failed units in the sample against a stated acceptance number. If failures stay at or below that number, accept the lot. If failures go above it, reject the lot. Record the count and the rule you used.
Treat any safety-related defect as a reject, even when the sample count would otherwise pass. A crack at a fixing point or a loose leg can drop a worker. No sampling rule overrides that risk.
Borderline results need a written rule, not a judgment call at the dock. A reading at the edge of a limit, a coating mark you cannot classify, or a test value close to the threshold all count as borderline. A borderline unit is not a pass and not a fail until the rule says so. Handle these cases the same way every time.
First, recheck the measurement. Confirm the tool is calibrated and the reference point matches the drawing. Repeat the reading on the same unit and on a second unit from the sample. Measurement error is common at the edges.
Second, draw a larger sample from the same delivery. Test the added units with the same method. The wider set shows whether the issue is isolated or spread through the shipment. Keep the original readings with the new ones.
Third, escalate unclear cases to the engineer who owns the specification. Ask for a written decision and file it with the delivery record. Write the reason, the date, and the name of the person who made the call. Do not release borderline units on a verbal okay.
Finally, hold the batch until the question closes. Mark the borderline units and keep them apart from accepted stock. A short delay costs far less than a failed installation. Strong quality control lives in these small decisions. Consistent rules keep your manhole step quality inspection defensible, and they protect the next crew who stands on the step.
Write down the condition of every step you examine. Use simple grades such as good, fair, or poor. Add the observations behind each grade. Note corrosion, cracks, holes, or coating damage on the sheet. A grade without a note tells the next reader nothing.
Record the results of each check in one place. List the visual findings, the measured dimensions, and the outcome of load, pull-out, and impact testing. Add the sample size and the units you selected. Note the coating condition on each sampled step. Keep the testing and quality records together with the delivery papers. This habit turns scattered notes into a clear inspection quality control file.
Tie every record to its batch. Write the batch code on each sheet and on each photo. Link the batch traceability documents to the same file. A record without a batch code cannot support a later claim. Traceability depends on this link, and a weak link breaks the whole chain.
Store the file where you can find it fast. Keep paper copies dry and digital copies backed up. Set a retention period that matches your project and your contract. Many projects keep records for the life of the installation. Check your specification for the exact rule. Good traceability lets you answer a question months later without guesswork. It also shows your quality system works, batch after batch.
Move a failed batch out of accepted stock as soon as you record the finding. Park it in a marked hold area with clear physical separation. Keep rejected units away from good stock so nobody mixes them by mistake.
Tag every rejected carton with a red hold label. Write the batch code, the date, and the reason on the tag. Note the specific defect, like a crack at a fixing point or a coating gap. A tag with a clear reason stops the carton from slipping back into inventory.
Notify the supplier in writing within one business day. Send the inspection sheet, the photos, and the sample count. State the standard clause the batch failed. Ask for a written response with a root cause and a corrective action plan. Copy your project engineer on the message so the record stays complete.
Decide the fate of the held batch with a written disposition. Choose one path and record who approved it:
Return the batch to the supplier for credit or replacement.
Sort the delivery and accept only the units that pass every gate.
Accept the batch under a formal deviation, signed by the engineer who owns the specification.
Never release held units on a verbal okay. File the signed disposition with the batch record.
Follow up until the supplier closes the corrective action. Track the next two deliveries from that supplier under a tighter sample plan. Check whether the same defect comes back. If it does, escalate to your procurement team and review the supplier's approval status. Close the file only when a clean delivery proves the fix works. This loop turns one bad batch into a stronger supply chain.
You now have a full path for incoming inspection. Confirm the standard first. Review receipt paperwork and batch traceability records. Run visual, dimensional, and mechanical checks on a random sample. Judge every result against written acceptance criteria. Write down each finding with the batch code. This order turns a delivered load into a checked, release-ready batch.
A careful manhole step quality inspection is your best safeguard. It stops bad steps before they reach the manhole opening. That protects workers from failed steps and your project from rework. Treat each delivery as a checkpoint. Keep records consistent. Fix non-conformities quickly. Control quality at the gate, not at the jobsite.
Put the batch in your marked hold area. Send the supplier a written request for the missing records. Do not release the steps for installation until the paperwork traces to the delivered batch. A missing record is a finding, and you treat it like any other non-conformity.
No. Your sampling plan sets how often you test. Take test units from the delivered batch at the interval your procedure names. Tighten that interval after any failure. A supplier with a long run of clean deliveries may earn a lighter test schedule, but you keep the rule in writing.
Treat the mismatch as a non-conformity. A certificate for another standard does not prove compliance with yours. Ask the supplier to confirm the correct standard in writing. Hold the batch until the paperwork matches your project documents.
Yes, once the sample passes every gate. Your sampling plan speaks for the whole lot. Mark the opened cartons so the delivery stays traceable. If a later unit fails in the field, go back to the batch file and review your sample records.
Set the retention period from your project specification and your contract. Many projects keep records for the life of the installation. Store paper copies dry and back up digital files. A batch code on every sheet lets you answer questions months later without guesswork.


